How to Pass
Quick Links
-Minnesota CDL Manual Download Page
-Pre-trip Exam Checklist
** Note - the remainder of this page must be updated for a newer version of the CDL test that Minnesota has implemented **
-Pre-trip Inspection Walk Through for the CDL Express vehicle
-YouTube video of a sample Pre-Trip Inspection (credit goes to APEX CDL Institute)
Note: This sample videos and others do not match exactly what Minnesota examiners expect on the test - it is provided here so you have an idea of what the pre-trip inspection should look and sound like. The only items you are expected to check are on the Pre-Trip Exam Checklist. YouTube videos may not include everything you are expected to check - and checking items not on the pre-trip checklist list won't gain you anything and will also make the inspection take longer than the 30 minutes they want you to complete it in. Refer to the Minnesota CDL Manual for and Pre-Trip Exam checklist for definitive answers.
Note: The information contained on this page is provided free of any charge and may be used for by anyone for any purpose.
Knowledge Tests
First off you must pass the knowledge tests given at the driver's exam station. The most important thing you can do to pass these is to study the relevant sections of the commercial driver's manual which is available online (Minnesota CDL Manual). It can also be obtained from the Beltrami County DMV for a fee (not the Bemidji driver's exam station).
Page 1-2 (the 42nd page) of the manual has a chart showing which sections of the manual you should study and which ones you don't need to. You will need to pass the air brake test (section 5). You will also need to pass the combination vehicle test (section 6). The rest of the marked sections (A, 1-3, and 10-12) cover the general knowledge test.
Throughout the book there are "Test Your Knowledge" quizzes. Studying these and making sure you can answer the questions is another great way to prepare for the tests.
There is a 14 day waiting period after obtaining your CDL Permit before you may take the driving test. We can schedule the test immediately after you obtain your CDL Permit.
Pre-Trip Inspection
The first half of your exam is the Pre-Trip Inspection. This part of the exam is what seems to trip up many people. The most important thing to do to be ready for it is to understand why it's done and why you're being tested on it. The examiner doesn't want to see you show off mechanic abilities and knowledge, nor do they want to purposely trip you up and fail you. The thing they are concerned with is SAFETY. They want to know that you can find serious safety concerns on the vehicle such as impending brake failure. You do not want to come across as cocky.
You are allowed to use the state's Pre-Trip Checklist during the test. It will be given to you by the examiner and is the only sheet you are allowed to use. The key to passing the inspection it is to approach it systematically and in order, using this sheet. Jumping around the trucking checking things in a random order is an easy way to confuse both yourself and the examiner. You will be pointing out each item and describing what you would be looking for. Saying "it's in good conition" is unacceptable. It is CRITICAL that you point out the item and SAY what you're looking for if something were wrong. You must know what is normal before you can know what abnormal is.
Examples:
"Here are the front brake lines. They are not cracked, frayed, kinked, cut or leaking."
"Here are the driver's side mirrors. They are not cracked, bent, broken or loose."
"Here is the fuel tank. The cap is secure, the tank isn't cracked, rusted, dented or leaking."
It may sound strange at first, but this is what they need to hear you say. It shows that you know where the part is, what to check, what could be wrong with the part, and that you have a system for checking these items. You'll likely be repeating the words: cracked, bent, broken, loose, missing, rusted, dented, leaking and securely mounted many times.
Go through the checklist in order and cross out each item after you are sure you have thoroughly explained it. Skipping around the checklist will make it very easy to forget something. You are not allowed to miss many items.
Although you want to be thorough, you don't want to spend a lot of time over-explaining things and more importantly, you don't want to point out things that aren't on the state's Pre-trip Checklist. This can cause you to go too far over the 30 minutes they give you for the pre-trip inspection.
This pre-trip inspection walk through covers the procedure, what you will be looking for and need to point out, and also walk you through the air brake tests for the vehicle you would be using. Use it to study and help remember your way through the state's checklist sheet.
Air Brake Test
At the end of the inspection, you will also be checking the air brake system. This is a vital safety check. Study and follow the procedure carefully, and be sure you can repeat each step without looking at notes. You must explain what you're doing as you're doing it. This procedure will not be provided to you during the test. You must go through this procedure without missing any steps to pass the pre-trip - and it should be an area of focus when studying. In our experience, people who haven't passed the pre-trip inspection usually failed because of the air brake test procedure.
Road Test
Important things to remember while on the road test:
Look both ways at intersections, even if you're not stopping. Look both ways several times for trains at railroad crossings. Remember not to turn just your eyes, but to turn your head. Lean forward and back to see your blindspots and behind the mirrors.
Use the turn signal when making turns and changing lanes, signal early and check your blind spots.
When making a right turn, do NOT encroach the lane on to left as you make the turn to give you more turn space. Instead, pull straight out in the intersection without turning, then begin your turn. Pull straight out as far as you need to in order to make the turn without hitting the curb. The rear-most trailer wheels should come within 3 feet of the curb during the turn - if they don't, the turn may be too wide. Keep continuing your right turn until you are back in the appropriate cloest lane - do not end your turn in the middle lane.
When making a turn where there are multiple turn lanes going that direction, stay in the OUTER turn lane which allows you to make a wider turn.
When making a left turn onto a road with no traffic waiting, it is best to pretend there is a vehicle there waiting. Take the turn a bit wider so the trailer doesn't go over the yellow line.
When making a left turn at an intersection with a stop light (green), you are encouraged to drive into the intersection ("claim it") while waiting for an opening in traffic to turn.
Most imporantly, don't hit a curb. This is an automatic failure. Take care, watching the trailer wheels several times as you make a turn aroud a curb. Better to be a little wide then to cut it too close.
Keep both hands on the wheel, don't leave one on the shifter.
You should be down-shifting when coming to a stop. Stalling the truck or lurching/chugging is not an automatic fail, but does deduct points. You may shift gears in an intersection, but the truck must remain in gear when the truck and/or trailer is over railroad tracks.
When parking on a hill with a curb going UPHILL, turn the steering wheel LEFT. (Up, up and away)
When parking on a hill with a curb going DOWNHILL, turn the steering wheel RIGHT.
You will need to be close to the curb, within a foot. Get close and look in your mirrors to determine your tire distance. Don't park blocking any yellow/red areas of curb, driveways or mailboxes. Look and signal when approaching the curb and when leaving the curb. Merge into the driving lane as soon as possible.
Turn your cell phone off during the exam.
Remember that the examiner's goal is to ensure the safety of others on the road, and your own.
Road Test Backing Skills
You will be tested on three backing exercises. You will be scored based on errors and corrections you make. Each time any part of the truck or trailer goes between cones, over a cone, or hits a cone, it is considered an error. Each exercise has a five minute time limit.
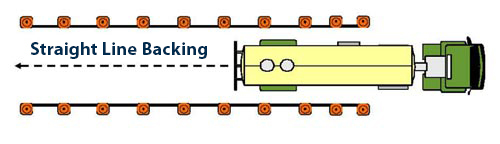
Straight Line Backing
This exercise involves backing your vehicle in a straight line 100 ft between two rows of cones (12ft space) without crossing the boundaries or touching the cones. You must use MIRRORS ONLY during this exercise.
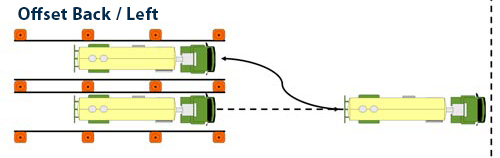
Offset Back Right/Left
This exercise involves you backing up at an angle into the space between the cones without crossing boundaries or striking any cones. The truck and trailer should be straight when you stop. You may sometimes look out windows during this exercise unless the examiner tells you otherwise during the instructions.

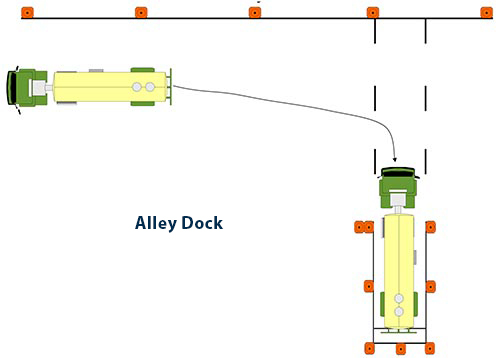
Alley Dock
This exercise involves you backing the vehicle around a corner and into a space between two lines of cones (12 feet apart). You must get as close as possible to the marked space (last 2 feet of the cone area) without going past it. The roadway in this example is 50 feet wide. You may look out windows. You may also park and exit the vehicle to check your position. You are allowed one pull forward during this exercise.